4.01.2016

the end, my friends

Well...today marks the end of this blog. I've been thinking about it for a while, and for a number of reasons have decided that this space seems to have run its course. Although it was almost always fun and I've learned a lot, it's time to move on. Cue the fanfare or whatever. :)

That being said, I'm not deserting the blog-world entirely, just shifting focus a bit and starting fresh. Which is why I'm delighted to share the news that my shiny, new blog is making it's debut today!

I hope if you've enjoyed this blog over the last few years or have bookmarked it at some point intending to read it but have never actually done so, that you'll join me over at....


I'm very excited about the new direction this blog will take and how it will be a better reflection of my life today.

I'll leave this space active for a couple months just in case, but after a while, I do plan on deleting it and thereby all the content as well. So if there was a particular post you were interested in, I'd suggest checking it out soon, or better yet, update your bookmarks and just join me over at the new space.

Happy Friday and happy blogging! I look forward to sharing more with you at Teaspoon, Thimble & Trowel.


3.10.2016

no-sew ottoman upgrade

Hi there friends!
Back in September when I was out of commission, a rather unwanted project presented itself. It was almost comical - two days after surgery on both hands which would put me out of crafting commission for a good long time, the fabric on the top of our ottoman gave out. It took less than a week for one small tear to extend the entire width of the surface. It looked awful and I hadn't even gotten my bandages off yet!

True to form, we threw a blanket over the top and left it that way for a good long time, 5 months apparently!

However, I finally got tired of the cover up last week and decided to pull out my tools and to get crafting again. The framework was still very sturdy so I had a feeling I could revamp it pretty affordably. What I have to work with:
Naturally, I started by somewhat-wildly ripping the whole thing apart. It took a lot of elbow grease to get all the staples out, but all in all, it wasn't terrible.
Next, I stopped by JoAnn Fabrics to browse upholstery fabrics on sale. I found a nice, thick woven material with just enough texture and color variation to be a decent cover up for stains. I bought 2.5 yards at $7/yd. Back home, I draped it all over the top to see where the excesses were (fabric looks much better in person, but a bit meh in pics).
I knew it would be too complicated to try to make a separate cushion and upholstered base so I figured I'd just make it all one big piece and ditch the dust ruffle-y bit from the original. Using spare strips of fabric, I strapped the cushion back to the original frame. (I got a good laugh thinking about the 5th Element. Multi-pass, anyone?)
Next, I make triple-layer strips of quilt batting to cover the wooden portion and also to create more of a cushioned seam between the actual cushion and the frame base. I then used strips of extra cover fabric to secure the new batting.
I flipped the cushion top-down onto the back side of my cover fabric and secured it underneath the framework. The corners were quite tricky but I went for a simple folded tuck. No picture because I forgot in trying to figure out the corners - oops. 

Next, I used a 10" upholstery needle to tuft the top with 4 buttons. It took a bit of figuring out but I hadn't done that before. Following another blogger, I secured the stitches around small rolls of extra fabric. 

During this step, I also stained and did a coat of polyurethane on the new feet - $5 ea at Lowe's. We didn't love the rolling feature and since the corner wood had built-in hardware, I decided to just swap them out for something more sturdy. (The straps and brown backing were left intact during the original deconstruction.)
Finally, flip it over and prop up your feet!
It's certainly not perfect - upholstery is not my calling - but Strider and I are both pleased with the upgrade and definitely with the price tag.

Cost of materials to upgrade = $45
Cost of new, similar ottomans from the original manufacturer = $350

Worth it, don't ya think?


1.31.2016

DIY Birth Ball Cover

Recently, I've had a blast using one of my Christmas presents from Strider -- a birth ball! In truth, it's just an exercise ball, but for doulas, it's a magic birth tool. They're fabulous for everyone, but especially pregnant mamas. The only problem is that they are tricky to transport -- I've heard from more than one doula about experiences chasing them across hospital parking lots or down maternity hallways. With my prenatal appointments well underway, I can easily agree. YourDoulaBag.com makes a fabulous cover that can even be ordered with custom print fabric. However, as I am trying to keep my expenses to a minimum, I figured this was a great opportunity to use up some of my stash fabric. I found only one other tutorial but I wanted a slightly different style. So, for anyone else looking to make their own, here's how I went about it.

To start, I pulled out large piece of a green batik print that I got on clearance a few years ago, measuring around 85" x 44". (Note: the colors aren't as pretty in the pics as in person, it's actually a lovely deep green.) I didn't use a pattern or have exact measurements before starting this -- I figured I'd go large and just cut off excess as I figured out how to build the cover around the ball.
I placed the ball in the center and pinned it at the top to see how much excess I could trim from the sides.
Right-sides facing each other, I sewed the short sides with a sturdy seam (red and yellow together).
Next, I folded one of the open ends up by an inch and sewed it to create the casing for the drawstrings.
To make the drawstrings, I used long strips of another stash fabric to create one long piece (it ended up about 10' long but I could've probably done with 8.5' or so in the end). I did a double-fold similar to a bias strip for quilting. It started around 3" wide but was 3/4" once the double fold was done.
 I finished the edges by hand and then sunk the ends into the hem.
Putting a safety pin through one end, I slowly fed the drawstring through the casing. Once done, Strider and I had a good laugh about how it basically looked like a skirt we could've both fit in.
Next, I put the ball inside and gathered the string to see how much excess I could remove from the top. 
(Many thanks to my handsome Vanna White.)
I ended up removing around 5.5" of extra before sewing across that edge. I placed the ball back inside and then tried to see how to finish the top. Sidenote: I had a good laugh picturing it as a giant Yoda head - Strider didn't see it quite as humorously as I did
Next, I pinned the two corners to the center-top using a safety pin through all three layers.
Then, I made the strap using the same stash fabric as the drawstring - it ended up around 3.5" x 36".
To secure the strap to the cover, I doubled the ends over around 2" and stitched them down.
After a little trial & error modeling with Strider, I decided to attach the straps at 10" distance from the top center point. The teal circle is the safety pin holding Yoda's ears in place. The red dots are where I pinned down the strap...just in line with the pin after I took the picture.
I sewed the edges of the straps on in a square and then x-shape to really secure them. I finished the cover by hand-sewing the center top point (the safety pin with Yoda's ears). I also sewed a decorative button over it to cover the gather-point. Then it was ready to go!
 Once again, a thank you to my ever-patient and supportive husband! Note: I made the strap extra long so that I still have room to also carry my labor bag on the same arm.
Overall, I'm really happy with how it turned out. It look about 3.5 hours, but if you wanted to cut that down, you could use a thin rope instead of making the drawstring by hand. The bag is also a little larger than necessary, but I think that is beneficial as it gives room for me to pump the ball up more or to even go up a size if needed in the future (mine is a 65cm). Total cost = $0.00 ...my favorite!

Has anyone else made a cover from scratch?

12.18.2015

major life update

Hi friends! It may surprise you to learn that I have not actually fallen into a well or been carried off by large birds...just been taking a bit of a blog break while busy working on other things. I don't have any projects to share today, but hoped I could share exciting life news otherwise!

First off, my hand(s) recovery is coming along very well. I've been released from PT and other than one slightly disgruntled thumb, I have almost all my normal function back. Absolutely no more numbness, tingling, or pain waking me up at night—surgery was a challenge but so worth it! 

Second news is that I have a new job! I started two weeks ago as an administrative assistant for the arts center of a prestigious school nearby. The people are super nice, it's much less stressful, and it's really fun to be surrounded by the arts again. God is an amazing provider! Plus...it will be much more conducive to my third piece of news:

I've finally figured out what I want to do! While out for surgery, I told Strider I felt like I needed to spend the time at home praying about / figuring out what I really wanted to pursue. Through a series of beautiful events, the perfect answer revealed itself: I'm now pursuing the path to be a...
source
If, like many people, you've never heard of doulas, they are birth companions/coaches who provide physical, emotional, and informational support to women & families before, during, and after birth. After much prayer and thought, I've realized that this is where my heart lies and a path which encompasses so many of my passions!

For the last few months I've been diligently researching, meeting with a variety of professionals, and moving forward with this pursuit. Though there are a number of great organizations out there, I decided to do my certification through Childbirth International and I am excited to say that I'm closing in on finishing my certification work. I already have a couple of my student-births lined up and a stack of business cards slowly making their way all over town. It is such an amazing community and I've been encouraged greatly by the response from family, friends, and other professionals I've met thus far. I finally feel confident that I am pursuing a path that God has been leading me towards for many years, I just didn't see it till now (which is often how it goes, it seems!). So if you know any pregnant mamas in the south-central PA area, please send them my way!
That's all folks...all my big, exciting news! I hope you all are doing well and that you are excited about festivities with family and friends next week. See you in 2016, friends!

source

10.06.2015

diy vow embroidery

Happy Tuesday! So...as an update, my surgery went well and recovery is very slow but steady. I got to spend a whole week with both hands wrapped so big I could've given Rocky a run for his money. Thankfully, my mom and hubby are the two most patient, helpful, encouraging, and amazing people in the world!! Also, it's amazing how triumphant you can feel being able to brush your own teeth after two weeks of needing help. Big stuff!

That being said, I'm definitely in a no-project zone for a while so I thought I'd share a project I finished a few months ago. So here goes.... Have a great week, friends!

-------------------------------------------------------------------------------------------------------------------------

Possibly my longest-running project to-date, I've finally, finally finished embroidering our wedding vows! 
I got the idea from Megan over at Lilac Saloon, who graciously shared a few pro-tips with me before I got started. 

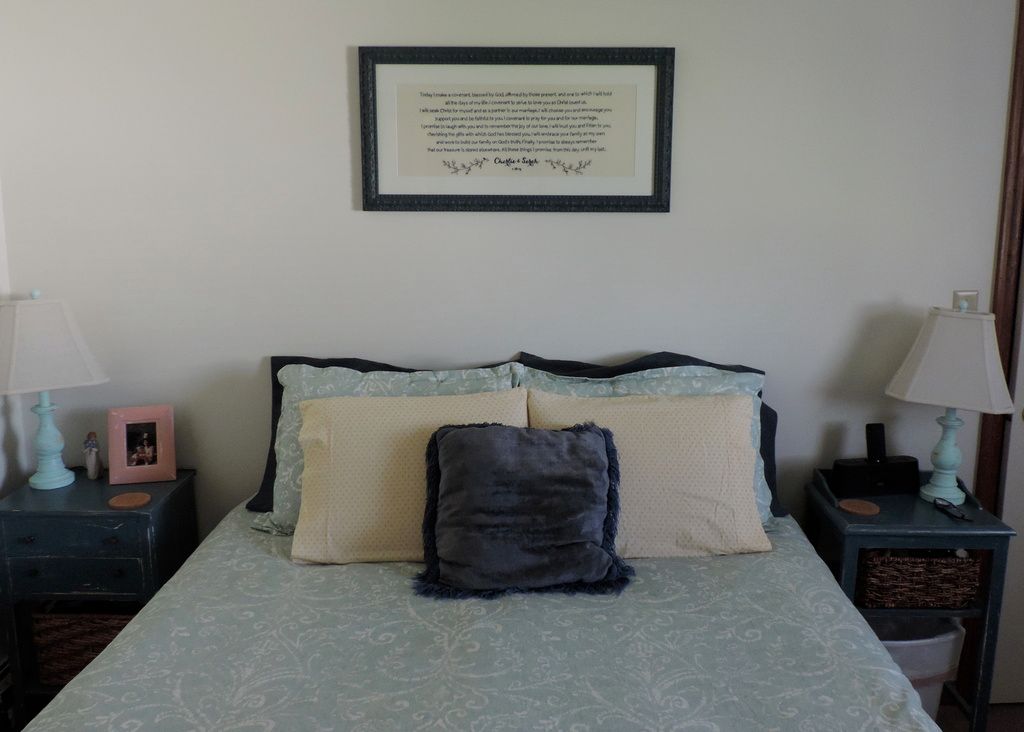
Shortly after we returned from our honeymoon, I went to Hobby Lobby and found a frame I liked for the project. I knew I wanted it to be blue and large enough to hang over our bed. Next, I blocked everything out in a design program and got it printed at Office Depot.

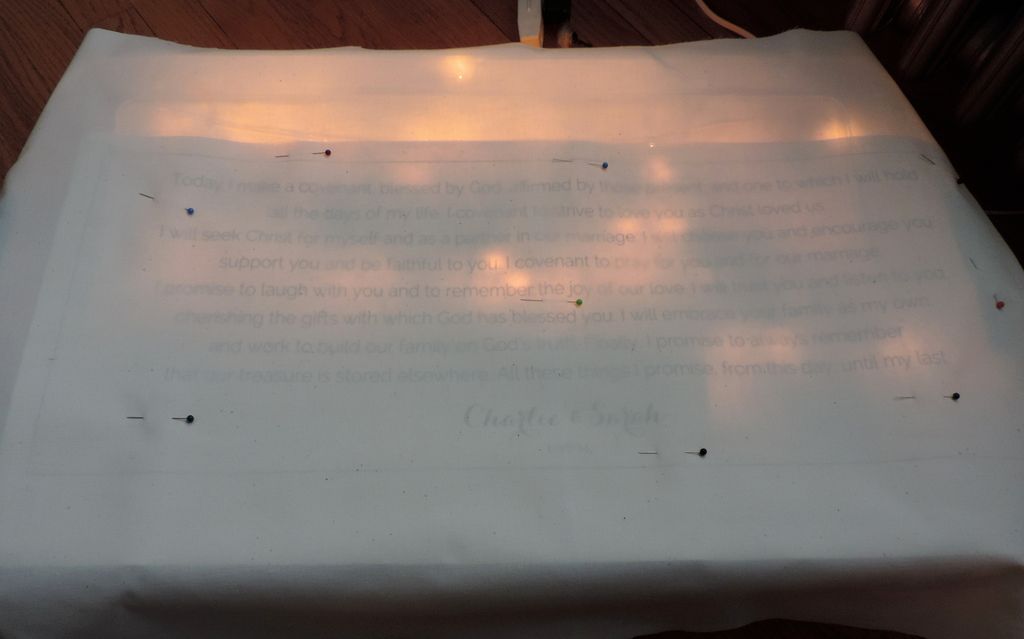
Using a makeshift homemade light box (aka an under-bed tupperware with Christmas lights in it), I transferred the text to a large piece of natural muslin with a thin-tip permanent marker.
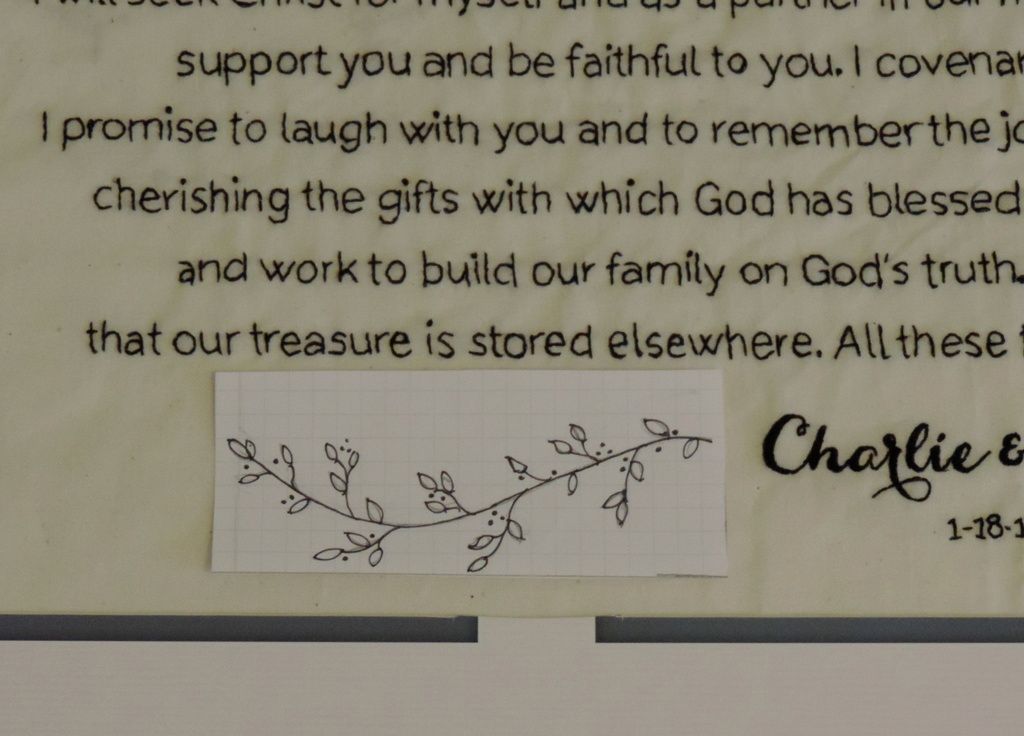
Add 7 months of putting it in a drawer and procrastination plus 22 and a half hours of backstitch hoop embroidery and all the lettering was finally done!

Then, I added a free-hand branches and leaves design at the bottom for a tiny bit of color.
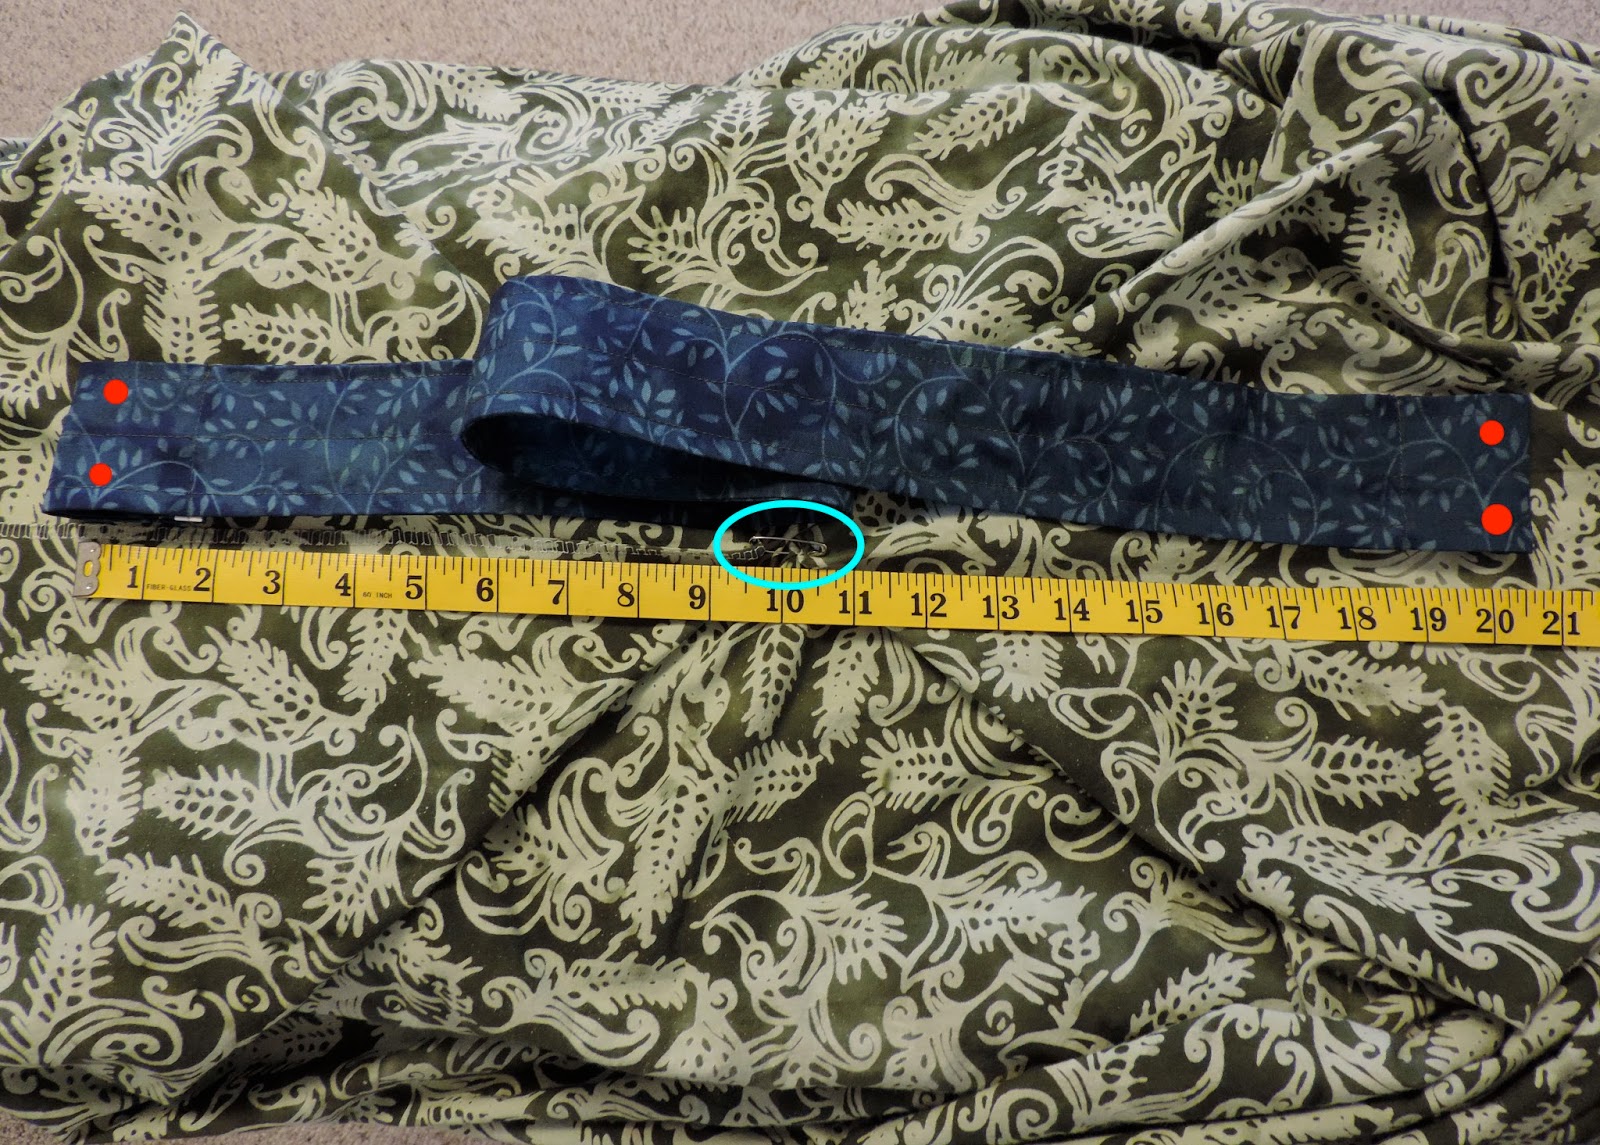
With a lot of help from Strider, I wrapped the fabric around a custom-cut piece of acid-free foam board, pinned it, and laced it tight for framing.
Once again with loads of help from Strider, I put the frame together for a FINALLY finished project!
We wrote our vows ourselves and feel very connected to the words we chose. Having them hung in our home, over our bed, is a great reminder for us to never forget what we promised that day. In case you can't read from the distance in the photo, it reads:


"Today I make a covenant, blessed by God, affirmed by those present, and one 
to which I will hold all the days of my life. I covenant to love you as Christ loved us. I will seek Christ 
for myself and as a partner in our marriage. I will choose you and encourage you, support you and 
be faithful to you. I covenant to pray for you and for our marriage. I promise to laugh with you and 
to remember the joy of our love. I will trust you and listen to you, cherishing the gifts with which God 
has blessed you. I will embrace your family as my own, and work to build our family on God's truth. 
Finally, I promise to always remember that our treasure is stored elsewhere. 
All these things I promise, from this day, until my last."

A very long but worthwhile project finally complete!


9.17.2015

shutter shelf

Hi friends! I promise, I didn't fall down a well or anything, we've just been pretty busy lately. 
Two big, quick updates for you:

- Strider started a new job! Which is super exciting and has been great so far. We're both very happy that he is in a 
  more encouraging work environment. Plus, he gets home an hour earlier every day!

- I will have plenty of blogging time coming up here soon as I am having bilateral carpal tunnel surgery this time 
  next week. Eeek! Although I'm no fan of medical procedures, I can certainly say that I am definitely looking
  forward to the end of 2+ years of frustration and pain. Praise God! Doctors orders are 6 weeks off for recovery,
  so reruns-of-The-Office, here I come! (Plus, my beautiful mama will be here.)

And of course, I wouldn't post without sharing a new project. This one took a while to come to fruition. My mom and I snagged a $2 pair of shutters at a thrift store last September and I've been waiting for the right project for them.

To start out, I measured the shutters and sketched up an idea to use them as the sides of a bookshelf. Naturally, I was a bit ambitious and had to start over when my lumber estimation at Lowe's was coming in around $60. No thank you. Back to the drawing board.
I scaled down a bit and managed to get the costs around $25. As you can see, I am not exactly a master carpenter. Strider double checked the math for me. (He's so great!)

After shamelessly convincing Strider's contractor uncle to lend me his keen eye and table saw, I was ready to paint.

Feeling more adventurous, I went for a deep plum color for the shutters. And with all those louvers (new vocab bonus!), painting by hand with a small craft brush was really the only way to go.
Once the shutters were purpley and drying, I used some leftover Minwax Red Oak wood stain to give some color to the fresh cut lumber.
Naturally, I distressed the shutters up a little. I love the imperfections and hand-made authenticity of this look. 
(Note: the top purple panel is a thin piece of plywood for the backer.)

After a bit of convincing, Strider helped me assemble the shelves. I looked at several tutorials that were more complicated and professional, but for my purposes, plain old nails were plenty good enough.
Ta da!! Pretty great, huh?
I have to say, although the color combination of the green and purple is a little crazy up close, I actually like the funky contrast. This is also my first project using a combination of painted and stained pieces, which I also really liked in the end.

It's perfect for our second bedroom/craft area and holds loads of supplies in two nice fabric bins I snagged at Target. Another win for DIY. And thanks again to my mom, who refused to let me leave the store without those shutters, even though I had no use for them at the time.


Back soon!

8.18.2015

diy hankie curtain

Hi friends! After wrapping up the Modern Simple Homemaking series a couple weeks ago, I decided to take a mini blog break to recharge. Although it was fun to do the series and certainly a challenge to stick to a posting schedule, I am glad to be back to the usual program.

Anyways, today I'm coming back with a fun and easy sewing project to share...
Vintage Hankie Curtains!

I started collecting vintage handkerchiefs a few years ago to use at my bridal shower tea, but I held on to them looking for just the right project. Purchasing this many hankies is not cost-effective at once but if you have the time to pick up one here or there at a good price, it's much more reasonable.

To start out, I took our existing curtain sheer down and spread it out on the floor. I placed the hankies on top to get a feel for how many more I would need. I originally planned to do two full-length panels but it would've taken a TON more handkerchiefs and ultimately would've looked very busy on the walls.

Instead, I decided to do a single, apron length panel that I could sweep the side. For suggestions on curtain length, check out the West Elm info below:
Apron length is option B - usually about 4" below the sill (source)
After positioning all the hankies in a good arrangement, I pinned all pieces into rows and attached them with a quick pass through the sewing machine. (This part was already done in the picture at the top.)

Next, I arranged the rows together and attached them together. It was a little tricky since all the hankies are different sizes (and none were truly square), but not too difficult. I also tried to line them up to make sure the best border styles showed.

Then, I took a length of double-fold quilt binding, opened it all the way, and pinned it to the back top of the curtain about an inch from the top. Sew along both ends 1/8 inch—this will create the pocket for the curtain rail to pass through and create a cute ruching effect with the remaining top inch. (I borrowed this casing idea from the hankie valences over at Flamingo Toes.)
I also decided to straight-line-cut the bottom of the curtain and add a piece of decorative lace.

After a little help from Strider hanging it up, it was good to go!

 I love the way the light comes in through all the colors!
I tied it back with a simple bit of ribbon; I like the shape of the single panel side sweep. And it shows off the lace edging at the bottom too.

So there you have it, a nice repurpose project for your vintage hankies!