4.29.2015

The Leibster Award

I am so very grateful to Aubrey from The Found Life for nominating me for The Leibster Award! (Learn more here.)

Though I can't seem to find the actual origin of this award, the basic idea is that it is a way for bloggers to recognize great content and to connect with other bloggers...which is what all this blogging stuff is about: community!

To participate, I answer 11 questions (provided by Aubrey) and then nominate some of my favorite bloggers in turn! Fun, huh? So, here goes:

1. How did you decide on the title of your blog, and what is it about?
As I share on my About Me page, the title "A Song for the Birds" comes from one of my all-time favorite songs: Simple Life by the Weepies, which helps me remember my goal of living simply.


2. Where does your blogging inspiration come from?

My inspiration comes from our simple, normal life. Either projects I'm working on, things I'm learning, or our experiences—I guess it's just a way for me to document the beauty of the everyday.

3. Can you give 11 random facts about yourself?
- I'm shockingly caffeine-sensitive for someone who wears a green apron to work
- In a failed attempt to make my high school bball coach angry, I semi-accidentally made the cheerleading team 
  (then stayed for 4 years and loved it)
- I have a Build-A-Bear named Grant whose namesake was an extremely attractive waiter I once had at a Steak & 
  Shake (he's super cute and snugglythe bear, to clarify)
- Although definitely not a runner, I completed the Chicago Marathon (side-by-side with my incredible mom!)
- I am irrationally and extremely suspicious of cauliflower. I also hate beans. And circus peanut candy.
- I've played the violin since I was six, but really, I just want to learn to play the cello
- My first job was as skating rink attendant...striped shirt and whistle included...ugh!
- I really like spicy food, even though I'm allergic to black pepper
- I consider myself pretty old fashioned and actually think I could've done very well during another time period
  (Despite my enjoyment of this blog, I'm not a huge fan of technology)

- Cool Mint Oreos are my kryptonite—I could eat an entire bag in one sitting. Definitely.
- I'm a super huge ridiculous scaredy-cat. I can't even watch parody horror movies.

4. What was your biggest accomplishment of 2014?

Although not technically an accomplishment, per say, getting married in Jan 2014 was definitely the best, most memorable part of the year! My best friend is awesome.

5. What is it you love most about blogging?

Meeting new people, reading other blogs, and feeling like in a small way I maybe contribute to someone else's life...maybe. It's also a fun creative outlet!

6. If you had 3 wishes, what would they be?

- To have better financial security (a goal we're diligently working towards every day)
- To be able to travel more
- To be able to heal other people's hurts
I am extremely blessed and content!

7. What is one country in the world you would like to visit? Why?

England. Hands-down. I would love to be able to see London but then to spend some time traveling the countryside. And maybe also some of Ireland.

8. What are you currently watching or reading?

Lately, I've been perusing a 1970s-era handbook on home entertaining (a clearance section find) and studying the book of Hebrews. Watching-wise, I just finished re-enjoying the BBC mini-series Cranford. Also, Strider and I watched Hector and the Search for Happiness recently and that was pretty great.

9. If you could live anywhere in the world, where would it be?
In a cottage in the English countryside...but only if I could bring my family and closest friends with. I honestly don't really care where I live as long as the people I love are nearby.

10. What is something you do when you need to take time for yourself?

Blog, home projects, or putting together gifts for family & friends. I really love giving gifts!

11. Where do you see yourself in five years time?

Still loving married life to Strider and hopefully, a mom. I honestly don't try to think about this too much, and instead try to focus on the now and trusting God to lead our future in the way He wants it to go.

So that's me and A Song for the Birds in a nutshell, I suppose! Thank you, again to Aubrey for my nomination. Now, I'm supposed to nominate 11 bloggers, BUT frankly, there are just too many amazing ladies out there.

Now, INSTEAD of just nominating a few people, please take a minute to check out my Community page and visit some all of the awesome pages I've linked to there. Plus, a few new blogs I've recently been lucky to come across:
And if you have a blog, feel free to take this as my nomination for your page too!


Here are the instructions if you want to participate:
- Answer the questions below.
- When you're done, comment on this post with your link so I can see your answers!
- Link back to your nomination in your post.
- Nominate your fav bloggers and give them 11 questions of your choice.
- Notify your nominees of their nomination and provide a link to your post so that they know what to do.

And here are the questions:
1. How did you decide on the title of your blog, and why?
2. From where do you find inspiration?
3. Will you share 11 random facts about yourself (please)?
4. What is your biggest goal for the rest of 2015?
5. Do you have any irrational fears or habits?
6. If you had 3 wishes, what would they be?
7. What is one country in the world you would like to visit? Why?
8. What are you currently watching or reading?
9. What wild career did you want to pursue when you were younger?
10. What is something you do when you need to take time for yourself?
11. Where do you see yourself in five years time?

4.24.2015

Easy Meal Planning

(OR Take That, Dinner! Look Who’s In Charge Now?)


Happy Friday, friends! Today’s post is probably one of my favorites. You may think I’m crazy for saying so, but meal planning really can be such a fun part of managing a home!

Whether you absolutely love to cook or are learning to love it out of necessity (which I certainly feel like some days), there is a lot to be gained from doing active meal plans. I prefer to do them one week at a time, but I know some people prefer going two weeks or even a month at a time, which is just so daunting to me. Find what works for you!

Planning your meals in advance not only reduces stress, but can also save big money—reduce last-minute grocery store trips multiple times each week (decreasing opportunities for impulse purchases), plus eliminate eating out by default when there is no dinner strategy, which really adds up!

Let’s get started! First think about what your best method of planning will be. Good old pen & paper? A dry-erase calendar on the fridge? Sticky notes? Or something digital like a Google calendar or meal planning app, perhaps? For us, handwritten planning works best. Bottom line: choose what you’ll use.

Now grab a notepad and pen for some brainstorming! The first task is to make a list of easy, no-brainer meals that can be slotted in any nightthink classic dishes and quick family favorites. Our Any-Night Meals list includes: spaghetti, breakfast for dinner, italian chicken (chicken breasts baked in Italian dressing), my family’s Cheesy Chicken Casserole, DIY personal pizzas, etc. Once you’ve got a handful of ideas jotted down, set the list aside. 

Whether you’re using pen & paper or a digital method, start by looking at your timeframe as a whole (one week, for ex). I recommend using a combination meal planning & grocery list so you have it all side-by-side. There are tons of these available online as simple or complex as you like, but here's the one I made/use (free, just click to snag it!):
Now, let's make weekly meals a breeze in 8 easy-peasy steps!
  1. Gather your favorite recipe resources. Whether you prefer grandma’s card box, online recipe storage, magazine clippings, or a stack of reliable cookbooks, be sure to keep your resources close at hand.
  2. Determine which meals need to be planned. I only plan dinners as we usually eat leftovers or sandwiches for lunch, but if your family needs more structure than just a dinner plan, account for other meals too.
  3. Look at your schedule & mark out “No-Plan Meals”. Do you occasionally work during the evening, attend a weekly church dinner, or have plans to eat out with friends? It helps to eliminate those meals right away. (Plus, actively planning to eat out rather than doing so as a default makes it more special!)
  4. Note time-restricted meals. Are you working late or have lots of errands which will restrict cooking time? Refer to your pre-made Any-Night Meals list and add in a something you can prepare quickly.
  5. Try something new! Find an unknown recipe that catches your eye and write it down for your least-busy day of the week. I try to test 1-2 new recipes each week, which is challenging but fun.
  6. Avoid the chicken rut. It’s easy to accidentally end up eating a different type of chicken every night, which is neither healthy nor interesting. Try to balance the week with at least one beef/pork, one chicken, one fish, and one vegetarian meal. Doing so easily introduces lots of variety. (If you don’t eat meat, nevermind.)
  7. Account for sides. Once you’ve made a plan for your main item, make notes about what sides will accompany it, no matter how simple...starches, fruits, and veggies are limitless in variety. If the main item is more challenging, stick to something simple like steamed veggies, applesauce, or baked potatoes. If the meat dish is easy-peasy, try something more exciting for a side, like baked zucchini fries—yum!
  8. Make a grocery list as you go. As you plan each meal/recipe on one side of the sheet, create your shopping list on the other so you know you’ll have everything you need for every meal. Just make sure to segment the list if you have must-purchase-later items. For example: If I am serving a fresh fish dish on Friday, I certainly don’t want to buy the fish on Monday. Instead I will circle it and note which day I need to pick it up. This later-in-the-week grocery stop takes 10 minutes and guarantees quality fish or meat.
Now that the meal plan itself is done, go two steps further to finish off the grocery list side of your sheet!
- Add weekly staples. Now that the meals are planned and their groceries are accounted for, add your family’s 
  weekly must-haves such as lunch meat, cereal, eggs, milk, orange juice. While you’re checking the fridge and 
  pantry to see if staples are needed, clear out anything past date—call it Weekly Mold Prevention.
- Do a walk-through. Stop by each room to look for additional household items that need to be added to the 
  shopping list: toilet paper, shampoo, cleaning products, paper towels, aluminum foil, etc.
You now have a complete plan of action for the week’s meals, plus a ready-to-go grocery list! The whole exercise takes me about 15 min/week and results in stress-free execution of tasty meals every night. This week for us:

The final, albeit important, aspect of meal planning is the execution! Once you have a meal planned out and the fridge and pantry are stocked, how do you get from planning to a meal on the table? The good news is that that part is easier than you may think as well!

Here are a few helpful hints to ensure safe, stress-less meal preparation:

- Mind the food danger zone: 40°F–140°F. Use a meat thermometer to ensure all cooked meat reaches or exceeds 140F. Additionally, make the minimal investment in fridge thermometers to always know your food is being stored at safe temperatures (40°F in the fridge, 0°F in the freezer). 

- Avoid cross-contamination: Be careful to keep thawing meat contained and to use separate cutting boards and knives for meat and veggies. It’s very easy today to develop safe food handling habits; if neglectful, you may bitterly regret it. I recently bought an inexpensive bright red cutting board and labeled it for meat only, which has proven helpful. Disinfectant wipes are inexpensive and easy to use...the perfect soulmate for kitchen surfaces!

- Follow the French: Have you ever noticed how tv chefs have little prep bowls of all their ingredients pre-measured and pre-chopped? This practice is called mise en place (French for “putting in place”) and is used in commercial kitchens around the world. Adopting this practice at home makes meal preparation so much easier. Read through the entire recipe first, gather and prep ingredients as able, then proceed with ease.
source
- Foil & Freeze: Even without owning a deep freezer, I’ve only recently begun to truly appreciate and utilize freezer space. So much surplus food can be saved when frozen. Use double layers of plastic wrap, airtight baggies, and labeled aluminum foil to tightly seal all frozen foods, from fruit for smoothies to pre-portioned meat cuts. Just make sure to keep an eye on long-term storage.

- Use common sense: I recently read online a suggestion for cutting onions under a stream of running water to eliminate tears. For obvious safety reasons, I wouldn't recommend handling a peeled onion and a sharp knife under running water. If you are unsure of how to use certain kitchen equipment or how to prepare a certain food item, take the time to look it up first. (And if onions really both you like they do me, wear swim goggles - no kidding.)

For more kitchen and meal prep tips, check out my Kitchen Management board on Pinterest. 
Both Pinterest and AllRecipes.com are both great resources for new recipes too! 
In addition, my most beloved cookbooks over the last couple years for manageable and delicious meals include:

Join me next week to make grocery shopping easier than ever while also creating safe, organized food storage!


This post is part of the Modern Simple Homemaking series.
To learn more about this series and see other posts, click the button above.


4.17.2015

Family File Folders

(OR Playing with Colorful Office Supplies)


As we looked at last week, a simple family budget is a great way to begin measuring and managing a large part of our homes...the moo-lah. While overseeing the flow of money in and out each month is important, it is equally important to keep well-organized records. Humans have a knack for accumulating ridiculous amounts of paper. Bills, pay stubs, junk mail, flyers, receipts—the list goes on and on. Before you know it, it’s easy to feel like you’re drowning in a sea of scrap paper.
source - gotta love random stock photography!
A family file system is the answer! 

Creating a filing system for your home papers is an easy project that not only makes life easier, but also has the potential to save you lots of money in the long run. Taxes, warranty information, records of bills paid...all have money-saving applications if ever called into question later on.

To begin, gather all your household papersand I mean all of them. (I find it easiest to just sit on the floor with lots of room all around you,) A notepad and pen will also be in order.

     - Sort everything into general piles (including a trash pile). Broad categories may include: housing, auto, 
       credit cards, medical, taxes, investments, warranties, etc.
     - Once every piece of paper has been sorted into a specific pile (no skipping!), take one pile at a time and 
       break them down into subcategories. Make an outline of these categories on your paper. 
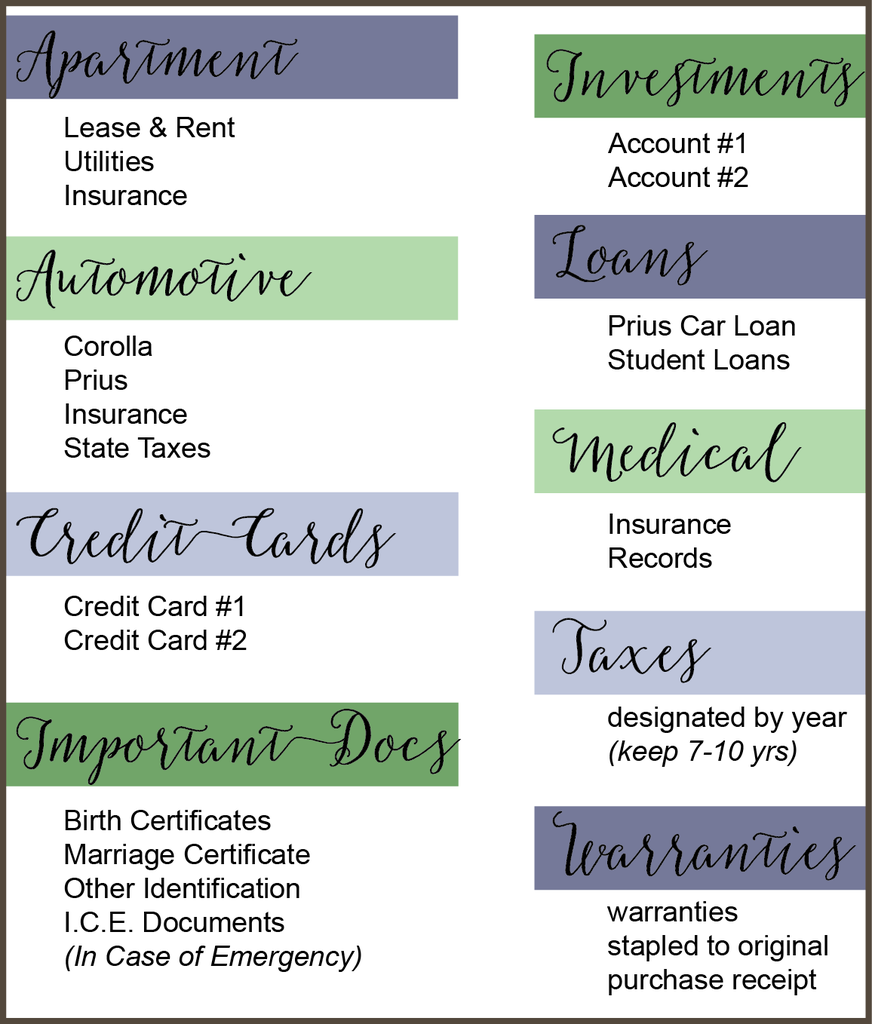
       Ours looks something like this:
     - Now that you have an outline of your system, it’s time to get supplies! It’s tempting to get supplies first but 
       I recommend doing the list first so you’ll know exactly how much to purchase.
               » First, determine how large of a container is necessary to hold everything. Some families will 
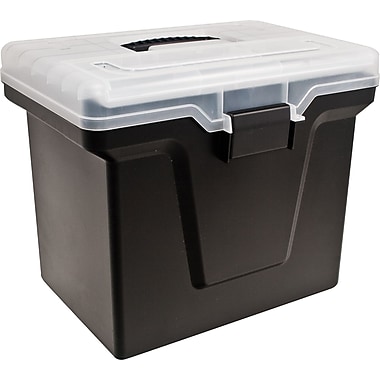
                  need a larger cabinet while others (like us) find a small file box sufficient.
                » Get folders. Staples, Office Depot, Office Max, and Walmart all have tons of options in various 
                   colors and styles. We like hanging folders for our main categories with plain manila folders for 
                   each subcategory. Color-coding categories is also a minimally more expensive option.
     - Once you have what you need, label and arrange your piles accordingly. Then, find an easily accessible but 
       somewhat conspicuous place to keep it in your home. 
     - Each month as bills are paid, use a common location to corral papers (a "command center") that will need 
       to be filed and those that can be tossed. Each week, file the important ones.
     - At the end of the year, it is a good practice to go through your folders and eliminate records that are no 
       longer needed. Just make sure to shred these items as they may have sensitive information on them. 
       If investing in a home shredder is impractical, simply bag the documents up and take them to your locate 
       Staples or Office Depot, both of which offer a shredding service for cents per pound.

How long should you keep specific records? The IRS publishes their recommendations online as well as their suggestions for managing household papers and important documents. If you own a fireproof safe, their recommendations for what it should contain are helpful as well; if not, you may want to consider investing in one. (We're still looking in to this.)


So now you have a great (albeit not super exciting) system for bills, important documents, and receipts. 
Next week, we'll get back to more fun stuff, like Meal Planning!!


This post is part of the Modern Simple Homemaking series.
To learn more about this series and see other posts, click the button above.

4.15.2015

My Reverse Bucket List

THE CIRCLE LINK-UP

Today I'm participating in the circle linkup via Kiki at In Its Time. She is so cute and creative! This month's prompt is come up with a list of things you've already done, rather than things you still hope to do—a reverse bucket list! After reading through several of the other linked-up posts and seeing all the cool ladies and things they've done, I just couldn't resist!

Here goes, my reverse bucket list:

- Moved out of my hometown. Definitely never thought that would happen, or that my new home would be so 
  similar to my first...just...with more cows. Loving it here, though!

- Got married! Almost a year and a half have gone by and I still cannot believe that I have been blessed enough to 
  marry the most amazing man I've ever known!

- Was a cheerleader in high school. A long, unlikely story that turned into a lot of fun and great memories.

- Participated in a beauty pageant. Haha! I still can't think about this without laughing...and all down to a 

  dare from my sweet little sis. A "Miss Congeniality" experience if ever there was one.

- Served on several short-term missions teams in Canada through NAIM. In a word - incredible.

- Got a tattoo. Neither my first then, nor probably my last now. Would've never expected that when I was younger.

- Made my sister's wedding cake. Not only was I honored to be asked to do it, but I can hardly believe that she's 
  grown up enough to be a married lady. Love you, C!

- Got a literature degree. I've always loved books and I still feel so blessed to have been able to spend four years 
  studying one of the things I most cherish.

- Running the Chicago Marathon. An incredible experience I am definitely fine with just doing once. haha!


It's been such an amazing life so far; I can't wait to see what God has in store for me in the years to come!!

Now, take some time to visit Kiki's page and see what the other ladies participating have done. Or comment below and share your coolest Reverse Bucket List experience so far!


4.10.2015

Creating a Simple Budget

(OR One B-Word Leading to Another)

Here we are at week five and hopefully settled into a beautiful and nicely organized home. The next step in creating a system of successful home management is to develop routines for the day-to-day life taking place in our homes. A substantial part of this is setting up and sticking to a budget

Are you already feeling the creeping guilt of bad spending behaviors? Don't!! Instead, think of a budget as a helpful tool—nothing more. It's about balance, not being bossed around. Ultimately, budgets are just guidelines, not absolute rules, which quickly become disheartening.

As with my post about moving, budgets are much easier 
to become proficient at while you’re young and have relatively simple financial demands. For us newlywed, non-parent, non-homeowners, there is no better time to tackle budgeting than now! 

To begin, take three months and track your typical expenses. No crazy purchases and no unusual penny-pinching...just 100% normal spending for three months. Write down every single transaction, and group them into categories. Some people prefer to physically track these in a binder, but Strider and I have found that a digital version is more accessible for us and thus, more likely to be used. Try starting with this basic budget spreadsheet:

BASIC BUDGET TEMPLATE (for Numbers)
BASIC BUDGET TEMPLATE (for Excel)

Plug in your tracked expenses, then add all incomes across the top. Whether you have a fixed salary and this number will always be the same, an hourly wage that varies check-to-check, or a mixture of both, its best to list everything for each month regardless.

Under expenses, list your spending categories, starting with monthly essentials like Rent and Utilities, then moving down to Cell Phones, Groceries, and Entertainment. Make your categories as broad or as specific as you like, just don’t leave anything out! If you have split cell phone plans or car loans, list those separately; if you share a plan, more generic categories may be sufficient.

Once you’ve compiled your three months of data, you should have a fairly accurate assessment of how and where your money is going. Now it’s time to analyze it all. Just looking at spending in a larger view like this can alert you to areas requiring immediate attention. It can also raise opportunities to cut costs that although not “too high” may be unnecessary. For example, many people are choosing to drop their cable bill for a lower-cost, on-demand subscription services such as Netflix or Hulu. Creativity with cutting costs is a fun challenge with huge rewards!

Regarding housing: It is recommended that your housing costs be no more than 25% of your total income. If your expenses in this category are too high, you may need to consider whether your living situation is manageable in the long-run, especially if you are renting and have the option to look for a lower-cost place. 

Considering utilities: aside from seasonal fluctuations, if you see unusual activity in your utility bill, you may need to look for a water leak or consider changing your heat/AC settings—small adjustments in temperature can have big savings on your bill. For specific savings information, the Dept of Energy breaks it all down here.

Now....you have enough data to see your average spending and you’ve thought through creative cost-cutting options, time to budget! Create estimates of what you think are reasonable amounts for each of your expense categories. List these projections next to your actual expenses. Many people find the “Envelope System” helpful for sticking to budget totals. At the end of the month, record your actual expenses and see how you did at coming in under target. If you come in under total, put a portion of the difference in your savings account.
It can also be helpful to track longer-term loans/debt at the bottom of your budget sheet. Though we make a car payment each month which is listed under our monthly expenses, we also track the balance of the loan at the bottom so we can actively see the debt going downWatching the numbers get smaller is a great motivation to keep paying down debt. Track savings accounts as wellthis is a great motivator to continue setting funds aside each month, no matter how small the contribution.

When it comes to financial matters, sometimes professional help is a necessity. Consider setting up an appointment with a trustworthy accountant to go over your basic financial situation and to look over your estimated budget. Even if just for a consultation, they will be happy to see you starting off on the right foot and may provide helpful tips for your specific circumstances. Luckily, we have a financially wise family connection who, although quite busy with tax season, took a moment to recommend the following as some general pieces of advice:
     - Spend less than you make. Period.
     - Stay organized and know how and where your money goes. 
       As Dave Ramsey says, “Money is active...it moves from those not managing it to those who do.”
     - Don't overlook the little things. Speaking as a green-apron-wearer, those daily lattes really do add up!
     - Pay off debt as quickly as possible by always making larger-than-minimum payments.
     - Limit credit cards: 1-2 with low interest rates help maintain good credit, more run the risk of mismanagement.
     - Plan your financial goals (ex: We will pay off our car loan by December 31.)
     - Learn to wait & save for big purchasesno financing! If you can’t afford it now, you don’t need it now. 
       (Necessities/emergencies are a different conversation.)
     - Review insurance policies periodically (2-3 yrs) to see if there are more affordable plans you qualify for.
     - Take advantage of matching or perk programs available to you through your employer or bank.
     - Treat yo self! (AKA giving yourself an allowance) Knowing that you have even just $5-10 a week for fun, 
       hobbies, lattes...whatever, will help you feel more diligent in sticking to the budget in other areas!
source
Tons of excellent, additional financial resources are available by Dave Ramsey.

Apartment Therapy also share some helpful tips and resources.

There are also a number of budgeting websites and apps, maybe even some through your bank—take time to look in to these options if a digital tracking method would be helpful for you.


Now that household money is on a path to order, don't miss next week's post on how to tackle the avalanche of home paperwork we all know so well!


This post is part of the Modern Simple Homemaking series.
To learn more about this series and see other posts, click the button above.

4.03.2015

Decluttering & Organizing 101

(OR Is Your Closet Secretly Starring in a TLC Show?)


We’ve been looking at how to find your domestic style and how to reflect your style in a home. Both are important in bringing personality to a living space, however, both are superficial. Another hugely important part of creating a beautiful and balanced home is the structure beneath the style, and yes...the closets. Good organization is key to reducing stress and increasing enjoyment of the home and the activities that take place therein. 

Admittedly, I lean towards the over-organizing end of the spectrum. Although you may not feel the same thrill at using a label-maker, that’s okay! If, on the other hand, you open a closet door it looks like this...
Source
...a little more organization is probably a good call. Though humans are wired to crave order, the degree of organization in which you will function best is determined only by you. Too little order and life feels stressful and chaotic, too much and we can begin to feel constrained by the rules, unable to relax and truly enjoy our homes. 

So how do we find the right place in the middle?

Start by clearing out the clutter! Decluttering can seem like a daunting task, but it makes the next part (organizing) so much easier. Keeping less clutter in the home not only makes life simpler but also helps save money—no need to purchase duplicate items just because you can’t find what you’re looking for. 
Sidenote: I’ve heard from several people that they tend to declutter during “spring cleaning” time, but I don’t recommend this. Clearing clutter is a task on its own so don’t stress about cleaning as well—count it an accomplishment to just get everything weeded out. So, let’s get started:

        1. Tackle one room or specific space at a time.
        2. Designate three piles or zones for sorting into: KEEP, DONATE / GIVE, TRASH
            (Notice there is no “Decide Later” zone...make those decisions as you go!)
        3. Once everything is sorted, take out the trash. Then, bag up items to donate or give away 
            and put them in your car trunk or another place away from the area you’re working on.
        4. Give yourself a high five 'cause you're halfway done!

Now, before you start putting all your “Keep Zone” items away, examine the space and create a sense of order.

Organization and space saving ideas are certainly not in short supply online. While these tips can be helpful, a substantial part of creating an ordered system is determined by what you are organizing and in what kind of space. Naturally, closets and cabinets are designed to hold all our stuff but it's important to have a system of order even within smaller areas of those spaces. And don’t forget about out-of-the-box storage like under beds or large furniture and on shelves above door frames or windows. 

Here are some general tips for making organizing a breeze, no matter what kind of space you have:
        1. If not already empty, take everything out of the space you’re working on so you can see exactly how 
            much space you have to work with and all the items that need to fit into it.
        2. Think about the purpose of the space and what it’s most frequent uses will be. For example: A linen 
            cupboard will require easy access to towels and sheets but also to hold extra blankets/pillows if possible.
        3. Start by nicely folding, stacking, or arranging essential items. Group smaller and like items in bins or 
            baskets, labeling if necessary. For example: containers for rags & cleaning cloths and seasonal items
        4. Use leftover space in decreasing order of accessibility to hold items in decreasing order of importance. 
            For example: Christmas linens in a bin on the very top shelfhardest to reach but only used once a year.
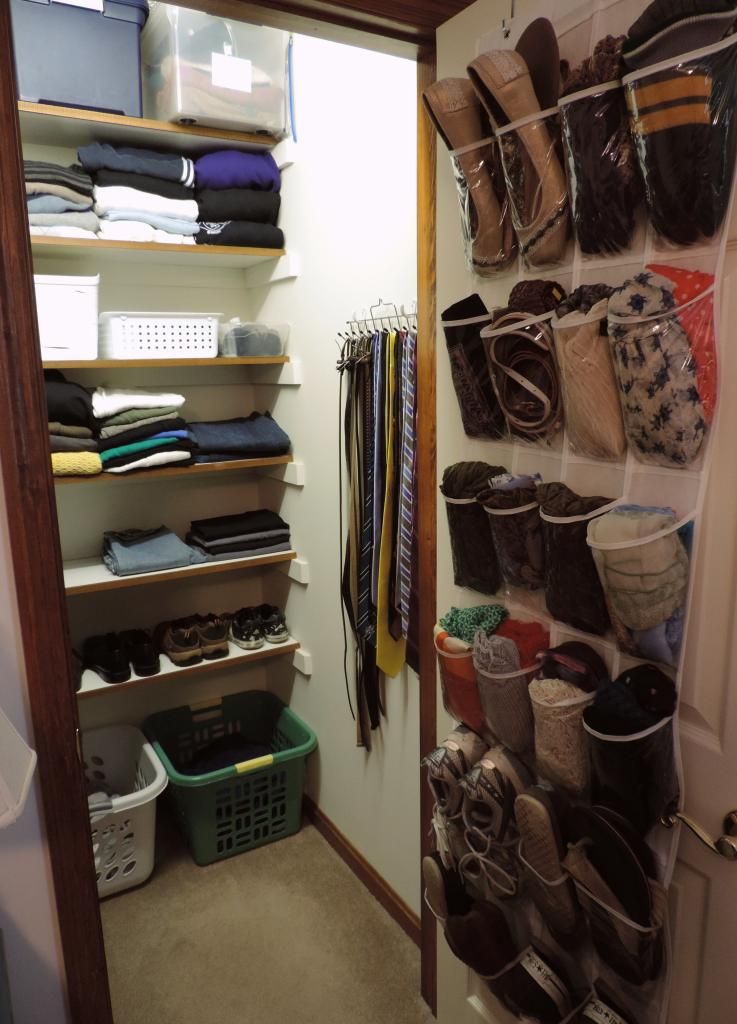
        5. Don’t forget about doors and wall space. I love over-door shoe organizers for scarves, hats, cleaning or 
            craft supplies...anything really. We also mounted a hanger on our closet wall for Strider’s ties and belts.
Over-door storage for scarves, belts, and a few shoes...so convenient!
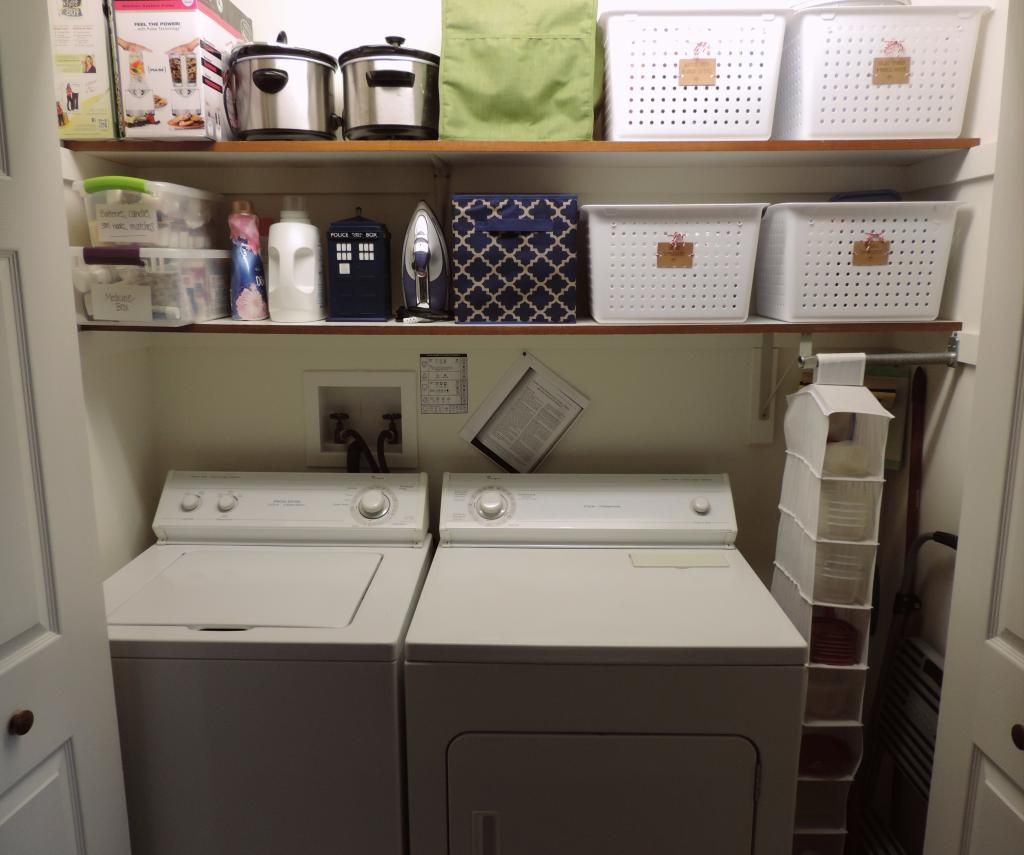
Contain It! I am a big advocate of containers and there is no shortage of variety at affordable price points. My favorite places to hunt down bins & baskets are: Dollar General/Dollar Tree, Walmart, Big Lots, and thrift stores. 
(As much as I love Target, they are typically over-priced in this category)
All baskets/bins courtesy of Dollar General. Notice the hanging shoe rack? Try awesome small tupperware storage!

Using the general organizational principles above, you can tackle any area of your home!

Here are a couple bonus area-specific tips:
For larger storage: Sturdy bins with locking lids are a must. As illustrated in my post about moving, I recommend keeping a master contents list for large tubs. Simply write down everything you store in each tub and label them with their storage location and a number (ex: Coat Closet #2: tablecloths, placemats, napkins). That way you can refer to the master list when looking for an in-storage item to see exactly where and in which tub it is located.
Numbered bulk storage makes locating things easy peasy!
For pantry storage: Depending on space, use shelf risers (or wooden blocks), a Lazy Susan, and back-of-door spice racks to create more storage opportunities. Invest in some plastic or glass containers to eliminate cardboard as well, this not only makes for a cleaner-looking pantry but is also recommended for safe food storage in many cases. Hobby Lobby half-off glass sales are perfect for racking up. (Super budget-friendly option: save sauce and pickle jars and reuse those instead.) Labels of various styles are available at any craft or office supply store. 
Our ever-evolving organized pantry - labeled jars and shelf risers are the greatest.
Random organization tips:
- Instead of towers of DVD cases, use a flip-page CD case to store movies and reduce case clutter.
- Address labels make great nameplates for the inside of book covers.
- Use an index card to label the contents of clear plastic bins and tape to the inside wall before filling and storing 
   on high shelves, that way you can easily see the type of contents. 

For more great ideas, check out my Pinterest Organization board with tons of great links. 

Looking for more intense organizing advice? I highly recommend Home Organizing 101 at A Bowl Full of Lemons. Her original 14-week program shows how to evaluate specific organizing needs one room at a time. Great stuff!

Now that your house has beautifully organized "bones", let's get the daily routines in order as well...starting next week with the dreaded B word.....budgets!


This post is part of the Modern Simple Homemaking series.
To learn more about this series and see other posts, click the button above.

4.02.2015

bananas & bedskirts

Today's post takes a quick break from my Modern Simple Homemaking series to share a couple random tips I've tested this week. But no worries, the series will recommence tomorrow with part two: Establishing Order.

In the meantime, I just had to share these 3 quick ideas.

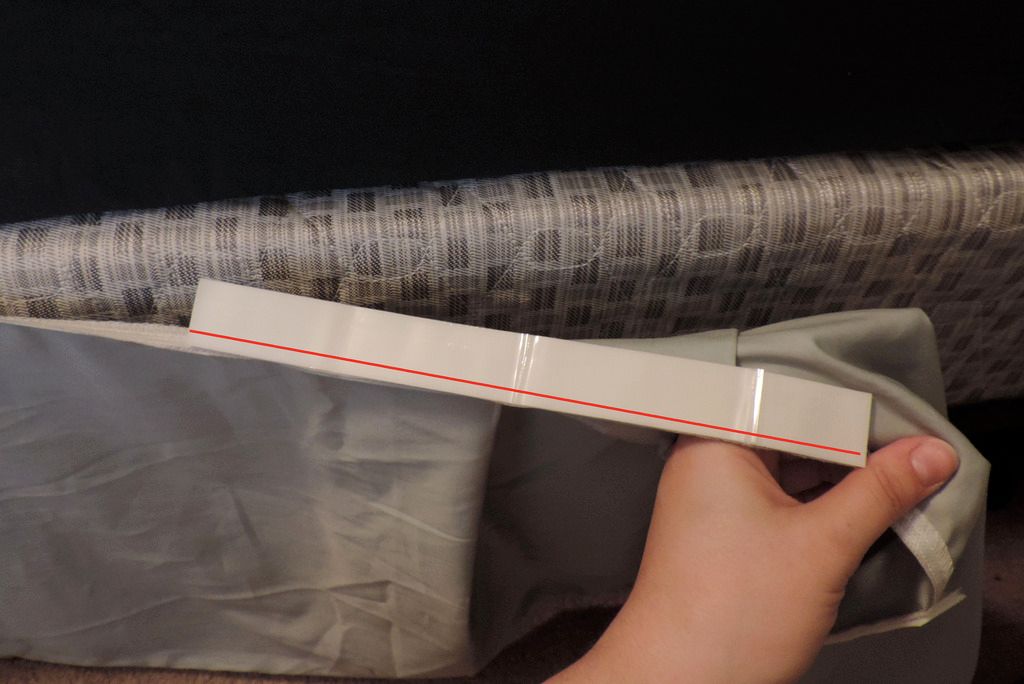
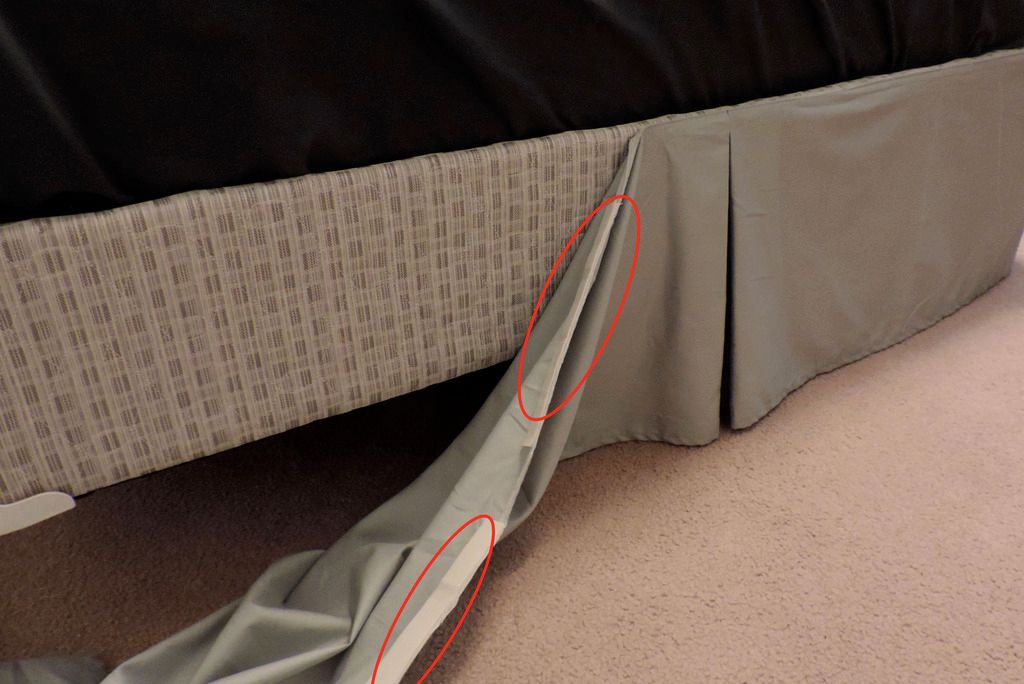
First is my bedskirt mini-project: Strider and I purchased our bedding on clearance just before the wedding as a "bed-in-a-bag" set. We couldn't agree on one to add to our registry so when we found one we both liked in a store, we jumped at the chance to snag it. Although we liked the convenience of all the pieces coming together in a set, I quickly grew frustrated with the bedskirt. The color and style were fine, but it had a thin batting-like layer holding it all together under the mattress (which I quickly tore a hole in by accident). It also kept sliding around and ending up uneven every time we remade the bed or moved the mattress at all—far too much trouble for a silly bedskirt. As such, I decided to try attaching it directly to the box spring with hook-and-loop tape (velcro). Here's how I did it:
- cut the cheap batting layer away from the main portion of the skirt
- purchased two 6' lengths of tape from Hobby Lobby (at 50% off) for about $9
- got Strider's help to calculate cutting the tape into equal segments according to the
  essential "to-be-held-up" parts of the bedskirt (pleats, ends, etc.) then cut the tape
- sewed the non-sticky side of the tape to the top hem of the skirt along segments
- placed other side of tape along the sewn segments (red line in photo below)
- working from the bottom of the bed to the top sides, I removed the adhesive paper on the back of the tape, 
  added a bit of hot glue for good measure, then pressed it firmly to the box spring

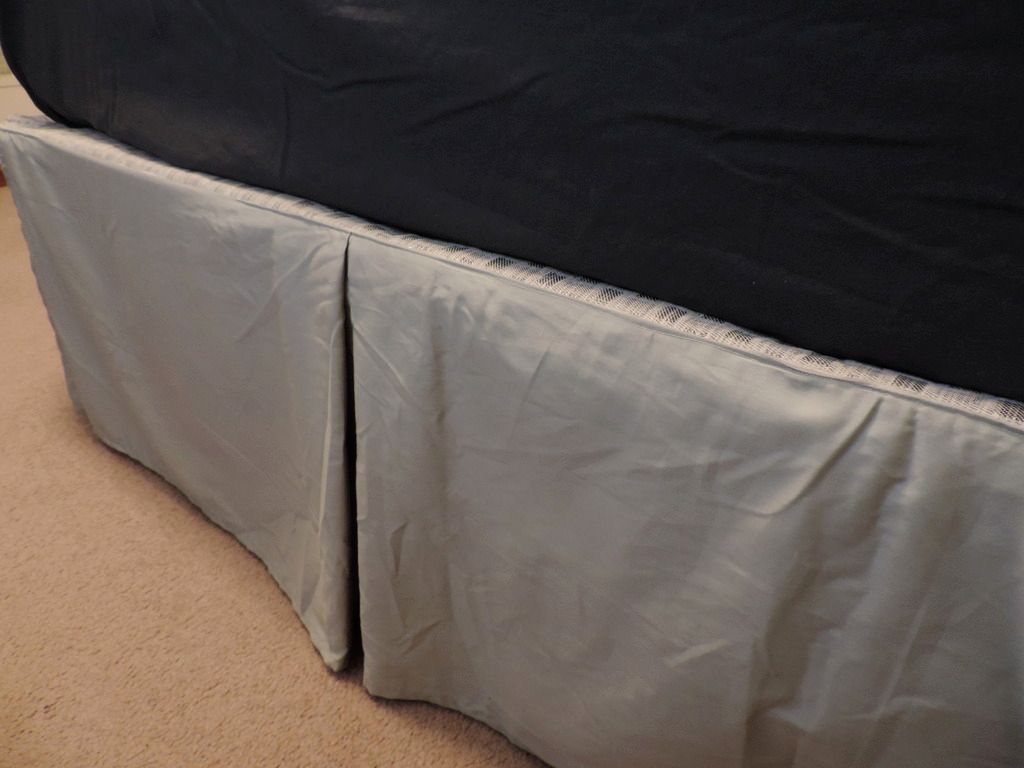
That's it - just let it dry well and stand back to appreciate your new bedskirt, which now stays in place and is easy to remove for laundering if need be. Ta-da!!
Final product: perfect aside from needing to be ironed


Now, two quick fruit tips...

I've been doing a bit of looking around for a while on how to keep bananas fresh longer. I know it's a silly thing but we love bananas and usually keep them around for a quick snack. The problem is that we always seem to end up with one that gets too brown. I've read lots of tricks online and finally decided to put them to the test!

I didn't take before photos but after a trip to the store last week, I pulled three bananas off the same bunch and set to work. The first was my "control banana" and had nothing done to it. Number Two tested the "wrap the stem in plastic wrap" method which I've seen all over Pinterest. Number Three was a recently read tip to place the whole banana individually in an airtight zip-seal baggie. After 8ish days, this was the result:
Pretty much speaks for itself! I peeled the first one and froze it for banana bread later on. Two days after this, the "wrapped stem" banana was pretty much a goner and the "baggie banana" was still almost as fresh as the day I bought it. Super helpful to know, or what?!

Last tip for today: I hosted a girl's night last Saturday and planned to serve apples with fruit dip. Trying to save some time, I thought I'd finally test out the "pre-cut-rubber-band-apple" idea I've seen several places online. 
source
The idea is that since the slices aren't exposed to air, they won't brown. Long story short, I tried it and while they didn't brown as much as if they had just been set out, I definitely would not count it as a real shortcut. Truth: best to just wait and slice right before serving.

So there you have it, a quick mini-home-project and two fresh fruit tips.
See you tomorrow for more Modern Simple Homemaking!