
In the meantime, I just had to share these 3 quick ideas.
First is my bedskirt mini-project: Strider and I purchased our bedding on clearance just before the wedding as a "bed-in-a-bag" set. We couldn't agree on one to add to our registry so when we found one we both liked in a store, we jumped at the chance to snag it. Although we liked the convenience of all the pieces coming together in a set, I quickly grew frustrated with the bedskirt. The color and style were fine, but it had a thin batting-like layer holding it all together under the mattress (which I quickly tore a hole in by accident). It also kept sliding around and ending up uneven every time we remade the bed or moved the mattress at all—far too much trouble for a silly bedskirt. As such, I decided to try attaching it directly to the box spring with hook-and-loop tape (velcro). Here's how I did it:
First is my bedskirt mini-project: Strider and I purchased our bedding on clearance just before the wedding as a "bed-in-a-bag" set. We couldn't agree on one to add to our registry so when we found one we both liked in a store, we jumped at the chance to snag it. Although we liked the convenience of all the pieces coming together in a set, I quickly grew frustrated with the bedskirt. The color and style were fine, but it had a thin batting-like layer holding it all together under the mattress (which I quickly tore a hole in by accident). It also kept sliding around and ending up uneven every time we remade the bed or moved the mattress at all—far too much trouble for a silly bedskirt. As such, I decided to try attaching it directly to the box spring with hook-and-loop tape (velcro). Here's how I did it:
- cut the cheap batting layer away from the main portion of the skirt
- purchased two 6' lengths of tape from Hobby Lobby (at 50% off) for about $9
- got Strider's help to calculate cutting the tape into equal segments according to the
essential "to-be-held-up" parts of the bedskirt (pleats, ends, etc.) then cut the tape
- sewed the non-sticky side of the tape to the top hem of the skirt along segments
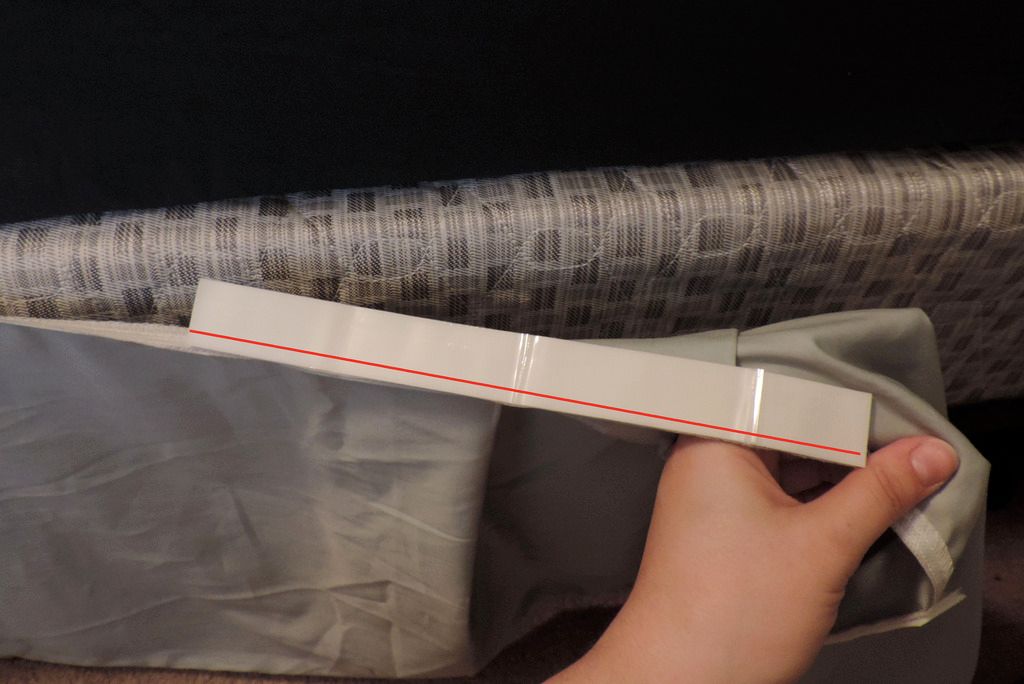
- placed other side of tape along the sewn segments (red line in photo below)
- working from the bottom of the bed to the top sides, I removed the adhesive paper on the back of the tape,
added a bit of hot glue for good measure, then pressed it firmly to the box spring
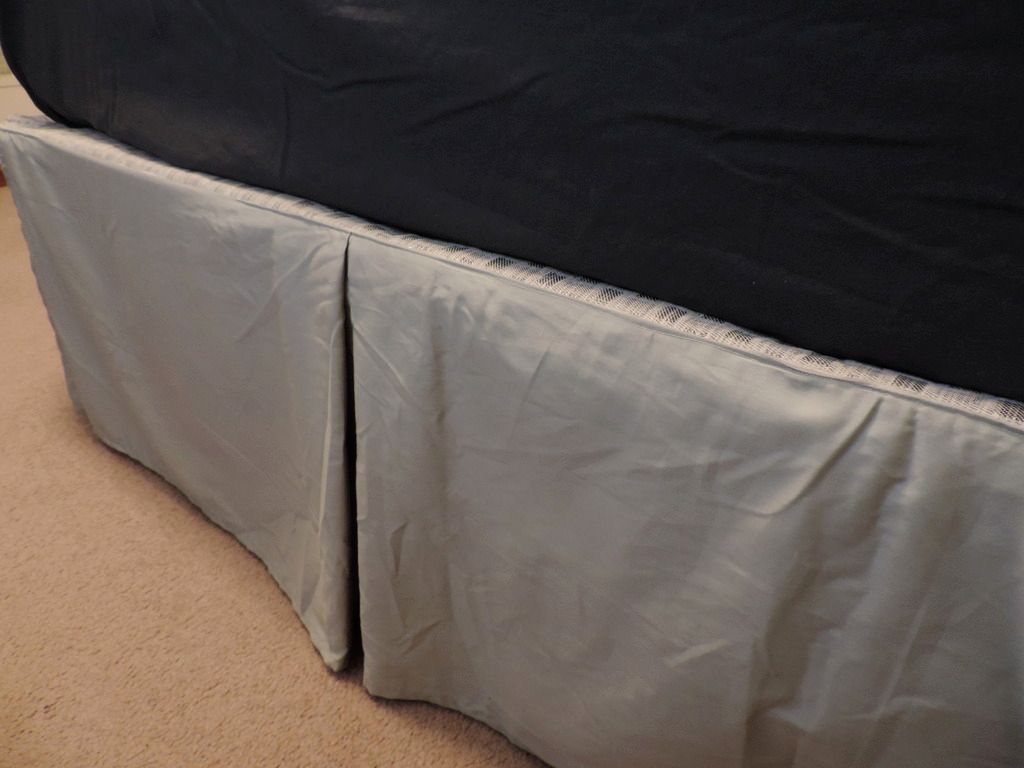
That's it - just let it dry well and stand back to appreciate your new bedskirt, which now stays in place and is easy to remove for laundering if need be. Ta-da!!

Now, two quick fruit tips...
I've been doing a bit of looking around for a while on how to keep bananas fresh longer. I know it's a silly thing but we love bananas and usually keep them around for a quick snack. The problem is that we always seem to end up with one that gets too brown. I've read lots of tricks online and finally decided to put them to the test!
I didn't take before photos but after a trip to the store last week, I pulled three bananas off the same bunch and set to work. The first was my "control banana" and had nothing done to it. Number Two tested the "wrap the stem in plastic wrap" method which I've seen all over Pinterest. Number Three was a recently read tip to place the whole banana individually in an airtight zip-seal baggie. After 8ish days, this was the result:
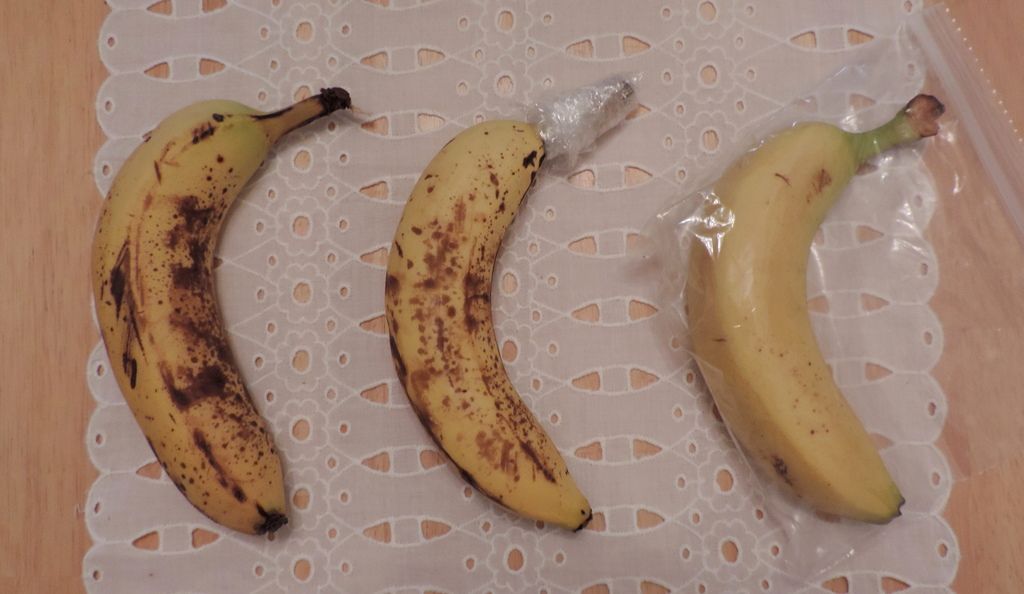 Pretty much speaks for itself! I peeled the first one and froze it for banana bread later on. Two days after this, the "wrapped stem" banana was pretty much a goner and the "baggie banana" was still almost as fresh as the day I bought it. Super helpful to know, or what?!
Last tip for today: I hosted a girl's night last Saturday and planned to serve apples with fruit dip. Trying to save some time, I thought I'd finally test out the "pre-cut-rubber-band-apple" idea I've seen several places online.
The idea is that since the slices aren't exposed to air, they won't brown. Long story short, I tried it and while they didn't brown as much as if they had just been set out, I definitely would not count it as a real shortcut. Truth: best to just wait and slice right before serving.
So there you have it, a quick mini-home-project and two fresh fruit tips.
See you tomorrow for more Modern Simple Homemaking!
- purchased two 6' lengths of tape from Hobby Lobby (at 50% off) for about $9
- got Strider's help to calculate cutting the tape into equal segments according to the
essential "to-be-held-up" parts of the bedskirt (pleats, ends, etc.) then cut the tape
- sewed the non-sticky side of the tape to the top hem of the skirt along segments
- placed other side of tape along the sewn segments (red line in photo below)
- working from the bottom of the bed to the top sides, I removed the adhesive paper on the back of the tape,
added a bit of hot glue for good measure, then pressed it firmly to the box spring
That's it - just let it dry well and stand back to appreciate your new bedskirt, which now stays in place and is easy to remove for laundering if need be. Ta-da!!
Final product: perfect aside from needing to be ironed
Now, two quick fruit tips...
I've been doing a bit of looking around for a while on how to keep bananas fresh longer. I know it's a silly thing but we love bananas and usually keep them around for a quick snack. The problem is that we always seem to end up with one that gets too brown. I've read lots of tricks online and finally decided to put them to the test!
I didn't take before photos but after a trip to the store last week, I pulled three bananas off the same bunch and set to work. The first was my "control banana" and had nothing done to it. Number Two tested the "wrap the stem in plastic wrap" method which I've seen all over Pinterest. Number Three was a recently read tip to place the whole banana individually in an airtight zip-seal baggie. After 8ish days, this was the result:
Last tip for today: I hosted a girl's night last Saturday and planned to serve apples with fruit dip. Trying to save some time, I thought I'd finally test out the "pre-cut-rubber-band-apple" idea I've seen several places online.
 |
| source |
So there you have it, a quick mini-home-project and two fresh fruit tips.
See you tomorrow for more Modern Simple Homemaking!
No comments:
Post a Comment
Thanks so much for your comment! I really love reading them and look forward to hearing what you have to say!